

Ok, now that I have made the curriculum choices, and made my spreadsheet, now what?
Now the fun part begins!
I have been thinking about this since last spring, trying to figure out a way to make Skylar more independent in her work. Last year we would do one subject at a time, I would go do laundry, she would finish her math, and wander off to find her brother playing cars, then I would return, she would be gone, & I’d have to beg, threaten, yell to get her back to the table to do her English. What a mess!
One thing she said at some point was that she would like a schedule of what was required each day or each week. This was a bit frustrating to me, because I didn’t have an easy way to give her this. I had resorted to writing the schedules in a datebook in pencil, so I could easily change things, but it didn’t enable me to give her the assignments very easily. I knew the plan, but she didn’t.

So, I started small and began with her math schedule. I just wrote each week’s work on a small post-it note, and put it directly into her math book. She then knew she had do to exercises 14-19 this week, and 20-24 next week. I put down suggested days, but this allowed her to work ahead if she wanted. It was a simple change but one that made a BIG difference. Once we began this, if I was off doing chores, and she finished her work, she could open her math and see what came next. A super simple solution!
I then began using this for her copywork as well, and again, success! We were copying Genesis 104 for the most part last year, about a verse or half a verse each day. Why she couldn’t just do the next verse each day on her own without a sticky note, I don’t know, but me writing it down made it more concrete to her. And the work got done much easier!
This simple discovery did not happen until quite late in the year, so I did not really implement it into her other subjects. This year, I am building on that simple idea with the new PLAN!
Here it is! I am going to share it in recipe format, because it seems easier to explain that way to me.
Supplies needed: (per student)
- 2 – 2” binders
- 2 – 1” binders
- 2 sets of 31 numbered dividers,
- 2 sets of 8 dividers,
- some page protectors,
- A couple hole punched pockets or folders
- 3 hole punch,
- copy paper, (multi-colored works well)
- copier/printer
- printer INK!!!
- a giant schedule spreadsheet

1. Divide the 31 dividers into the 2 large binders (1-17), (18-31) My Christmas break should fall after unit 17, so that is why I split it there. These represent the units/weeks of the year. Yes, there are 34 units, but close enough, IMO. If you need, buy another set of 8 dividers to finish off the weeks. These are the teacher’s main binders. This is Skylar’s set.

2. Put the set of 8 dividers into the 1” binder. This will be the student’s weekly binder. Let them pick a cute fun binder or decorate a plain one. Allow them to take ownership of this, as it will become very important! Label each divider by subject. Her tabs are: Circle Time (Hymns/Bible/Poetry/Logic), History, English, PE, Math, Science, State Study, iread. If you plan to have a set schedule of subjects each day, I’d put them in that order in the binder as well.
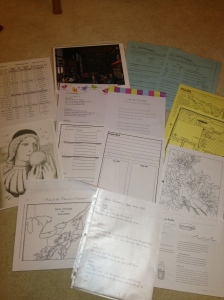
3. Print the notebook pages, coloring pages, science documents, state study sheets, maps and put in the proper unit section. Print copies of any poems, photos, art, or hymns as well. Put in directions for art projects, science projects, supply lists, etc. I used different colored copy paper for each subject (LA: blue; writing: purple; States: yellow; Science: green, Math: white). Don’t worry about these being in day order at this point. Just be sure you have everything needed for each week in the right unit. (Some things like the hymns have multiple units per hymn. I put these and the poems that correspond in a page protector (hymn front/poem back). Then, they will move from unit to unit, changing the poems as we go. It will help these pages to stay neat & to find them easily.)

4. Print a copy of each subject’s assignments (from the spreadsheet) and put into the tab area for each subject. I printed these in 4 unit sections, so a month of assignments for History, History coloring, and text reading assignments are on one page, along with check boxes for each day’s work. The Reading sheet has extension readers, read-alouds and independent reading on one sheet with checkboxes for reading and discussion/work for each day. You can see I separated them by unit, but didn’t put the actual date on them. I’ll put the dates on as we complete the work. Check a box off when read, then when discussed. (Actually I did put dates on these pages because I want to have these units complete BEFORE we go on our trip to Williamsburg in September. ) But for the most part I just have the approximate month we should be hitting these units.
5. At the start of each week, place the copies into the proper places in the subject binder. At this point, put the individual copies in the proper subject areas, in the proper order for the week, using the assignment sheets. I will probably do this on Friday or Sunday, or whatever day we end up finishing a unit.
6. As you go through the week, the student can look at their assignments for each subject, pull out the proper worksheet, poem, directions, or book and (hopefully) begin on their own when needed. Since the binder dividers are in the daily order, she can just flip to the next subject in the book.
7. As each assignment is finished, they can return it to their binder, or put it into the other 1” binder in the proper unit section. This binder is the “to be checked” binder. Then I can grade at leisure, and once graded, return it to the original unit binder when completed. If the student doesn’t put it into a second smaller binder daily, they can put the week’s worth of work into the main binder at the end of the week. I plan to use the 2nd binder daily, because I tend to lose papers needing to be checked, and that way I know what has been checked and what still needs correction. And I can check as the week goes on, to see what she is not completing, not understanding fully, or what is too easy for her.

8. Finally, I will either print a second copy of the assignment sheets or use the student copy to record the grades. That can go in the main binder with each unit as completed. It becomes a paper trail to easily follow as the units go on. And if time allows, I can input it into my computer tracking system. (We don’t need to report grades in NC, so that is something that happens if and when it can!)
Another thing I do as I grade, especially the math exercises or worksheets, is to put achievement stickers on if she does well. She is only in 3rd grade after all, and stickers are still fun! This lets me know later that I have graded the page. I put the number incorrect on the top of the page as well. If I find she missed a lot of one topic, I go over her errors with her, so we are sure she understands the concept.
I am optimistic that this system will work, if we are disciplined and make it happen. It will take a bit of prep on my part each week, but if all my copies are made NOW, then that prep will be minimal. My daughter loves to do worksheets so I believe this plan will work well for her. I have yet to determine if my son will like them as much as she does, but I plan to do a similar binder system for him.
We’re almost there, if I can only keep my printer running for a few more days. It’s been glitchy this morning, and I am afraid it is dying from overuse!
Shira
Tomorrow I will share about our scheduling plan…
